
My S13 SR20DET Prep
 04-16-2008, 08:33 PM
#136
Registered User

Join Date: Apr 2007
Location: Ft. Riley Kansas
Posts: 316
So all that you've done is great! Forgive me I havent been keeping up lately, but do you plan to redo the internals? I mean in all honesty you've done a great job of replacing the little things but when it comes down to it you've still got a motor with xx,000 amount of miles that you know damn well wasn't daily driven and treated right.
Do the right thing spend another 2grand and do a full OEM bottom end and head.
<3 to my favorite poster and thread.
Do the right thing spend another 2grand and do a full OEM bottom end and head.
<3 to my favorite poster and thread.
 04-18-2008, 02:30 AM
#137
Contributing Member
Thread Starter
Join Date: Sep 2002
Location: Starkville, MS.
Posts: 1,192
 04-18-2008, 02:49 AM
#138
Contributing Member
Thread Starter
Join Date: Sep 2002
Location: Starkville, MS.
Posts: 1,192
So all that you've done is great! Forgive me I havent been keeping up lately, but do you plan to redo the internals? I mean in all honesty you've done a great job of replacing the little things but when it comes down to it you've still got a motor with xx,000 amount of miles that you know damn well wasn't daily driven and treated right.
Do the right thing spend another 2grand and do a full OEM bottom end and head.
<3 to my favorite poster and thread.
Do the right thing spend another 2grand and do a full OEM bottom end and head.
<3 to my favorite poster and thread.


Example:
Guy says, "Why are you smiling so much...all you did was put on a new oilcap?"
I reply, "That's right and I'm damn proud of it!"
 04-18-2008, 08:10 PM
#139
Registered User
Join Date: Apr 2007
Location: Ft. Riley Kansas
Posts: 316
Agreed man, redoing a head is pretty intimidating. With patience and double chekcing your work I wouldnt worry about it. + it will help in the future!
I'm excitd you're completely redoing this motor!
Please come drift in Kansas this year. July 16
I'm excitd you're completely redoing this motor!
Please come drift in Kansas this year. July 16
04-19-2008, 12:10 PM
#141
Contributing Member
Thread Starter
Join Date: Sep 2002
Location: Starkville, MS.
Posts: 1,192
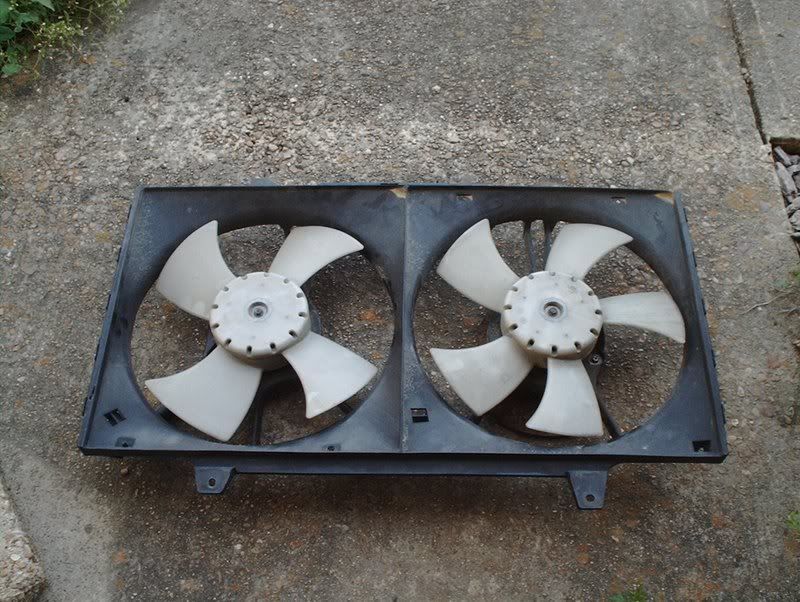
Went to the junkyard today to help a friend pull the head off a 1st gen Integra and while we were at it I noticed a purple 2nd gen Altima sitting a couple of feet away. When we were done I went over and popped the hood, the radiator was gone but what did I find just sitting in the bay....
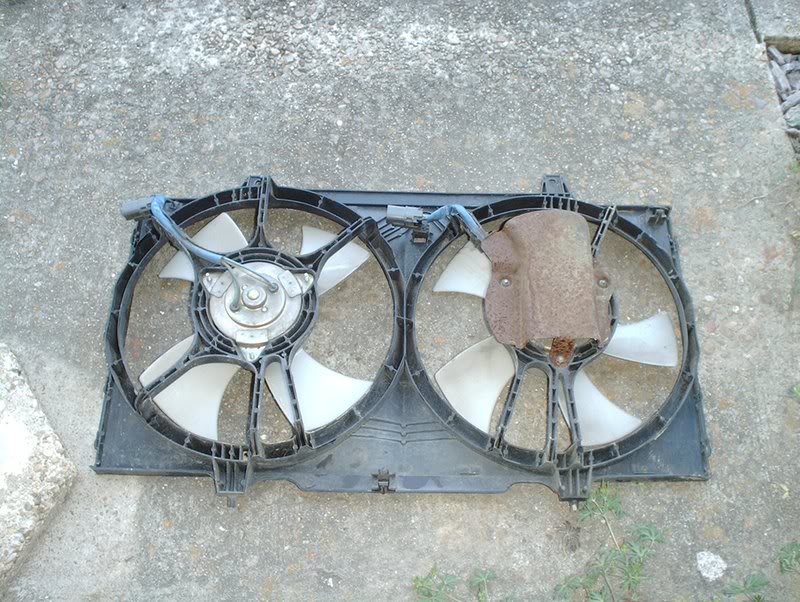
this set of Altima fans in great condition.

I'm not sure if this is the set that everyone uses but we tested them at the junkyard, they both run and I only paid $40 for them so if this is the correct set then I came out on top. If these are the right fans I'm gonna clean them up and sell the Permacool.
this set of Altima fans in great condition.
I'm not sure if this is the set that everyone uses but we tested them at the junkyard, they both run and I only paid $40 for them so if this is the correct set then I came out on top. If these are the right fans I'm gonna clean them up and sell the Permacool.
Last edited by positron; 04-19-2008 at 12:13 PM.
04-19-2008, 01:07 PM
#142
Went to the junkyard today to help a friend pull the head off a 1st gen Integra and while we were at it I noticed a purple 2nd gen Altima sitting a couple of feet away. When we were done I went over and popped the hood, the radiator was gone but what did I find just sitting in the bay....

this set of Altima fans in great condition.
I'm not sure if this is the set that everyone uses but we tested them at the junkyard, they both run and I only paid $40 for them so if this is the correct set then I came out on top. If these are the right fans I'm gonna clean them up and sell the Permacool.
04-19-2008, 03:05 PM
#144
04-20-2008, 02:26 AM
#145
Contributing Member
Thread Starter
Join Date: Sep 2002
Location: Starkville, MS.
Posts: 1,192
Fan
I had originally bought a 14" Permacool fan that I planned to use for my swap but after doing some research and a stroke of luck, I was able to nab an Altima dual fan set-up instead.
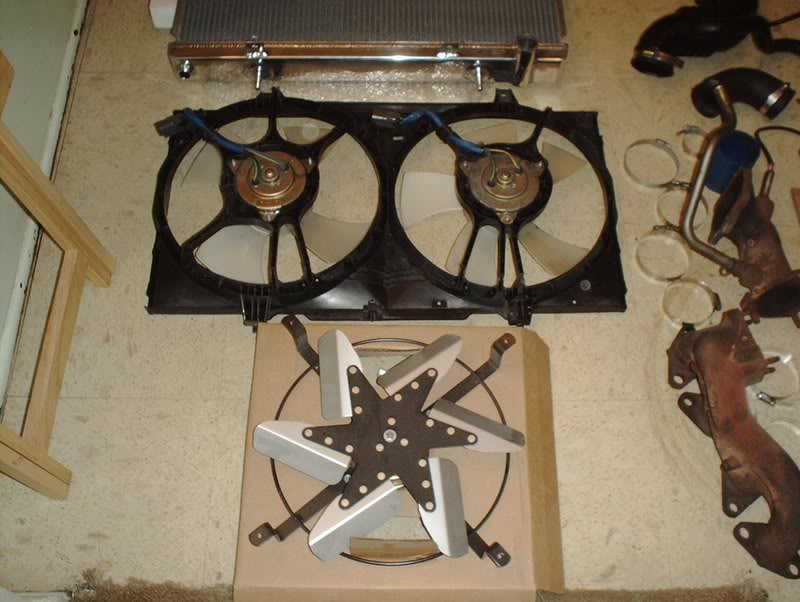
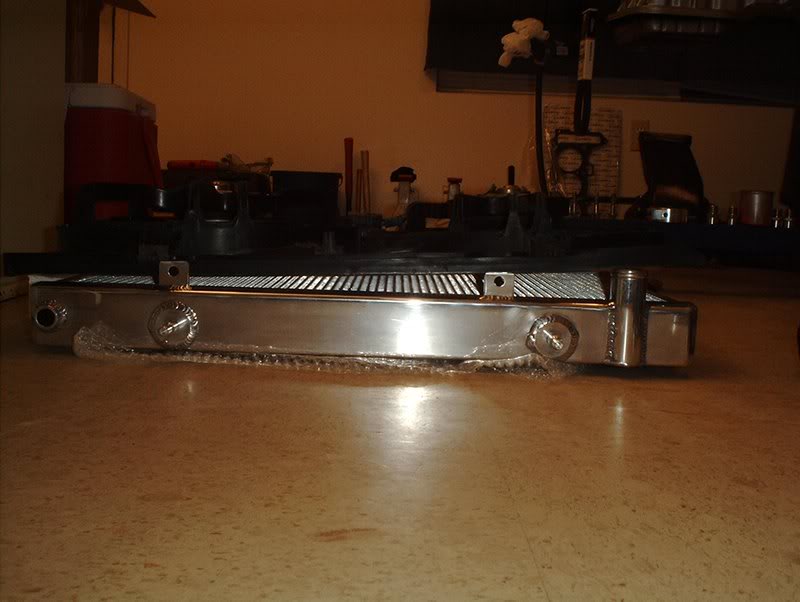
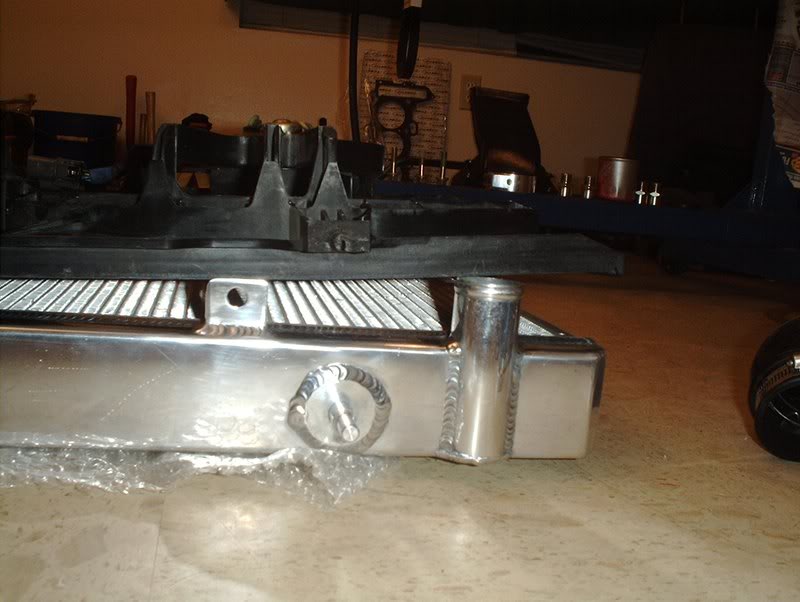
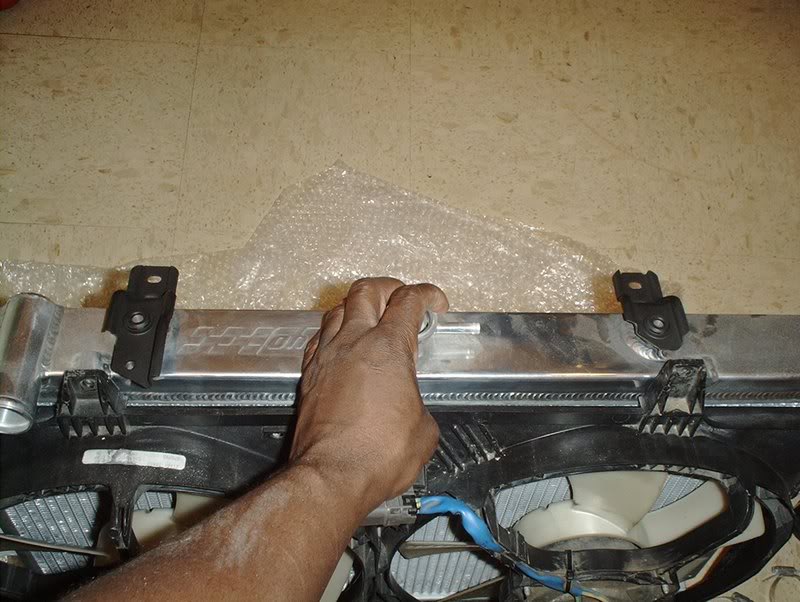
Koyo rad, Altima fans and the Permacool.
The dual Altima fans cover the entire surface area of the radiator, as a matter of fact, they hang over a bit which is where you might run into a slight complication.
The Altima fans don't exactly line up with all the mounting points on the Koyo radiator so it doesn't sit flush against the rad. This is where you have to mod it for fitment. This is where I didn't want to go, if I have to mod this thing and couldn't do a clean job I was planning to just go with the Permacool setup or just wait and save for the Flex-a-lites which to my knowledge have no fitment issues.
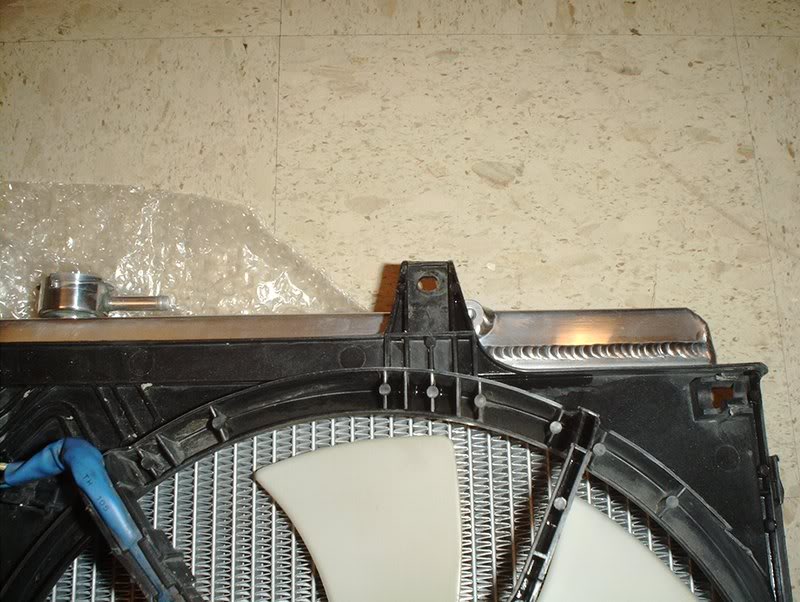
The upper left mounting point fits perfectly, all I will need to do here is place a bolt to mount the fan to the Koyo.
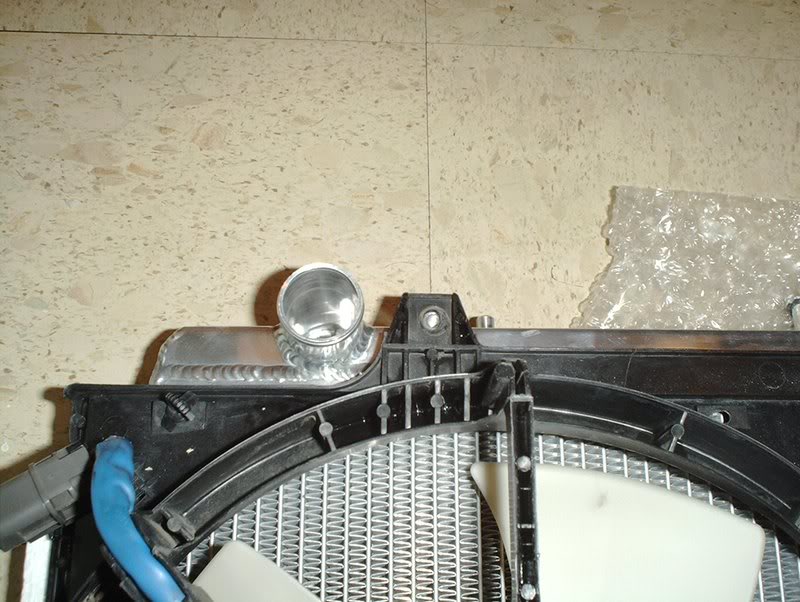
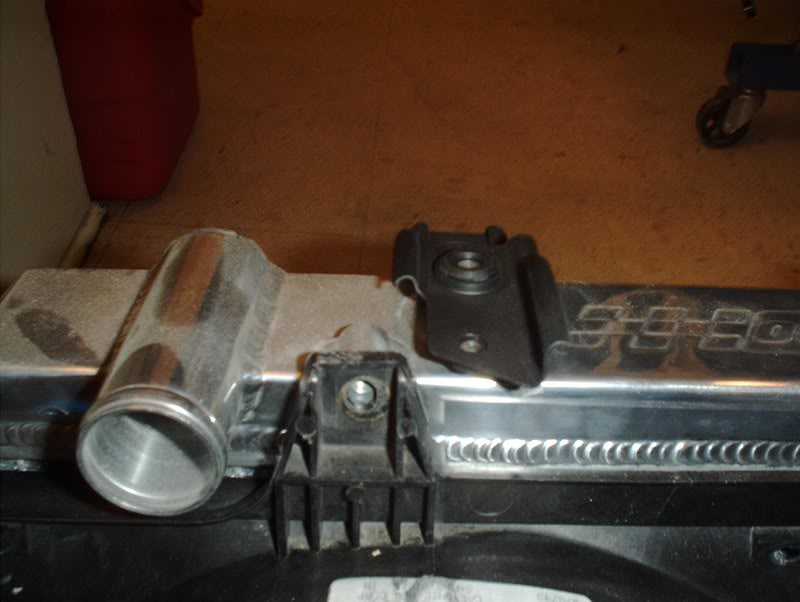
The upper right mounting point does not line up, I also thought I might have to trim this off because of the radiator bracket but we'll get into that later.
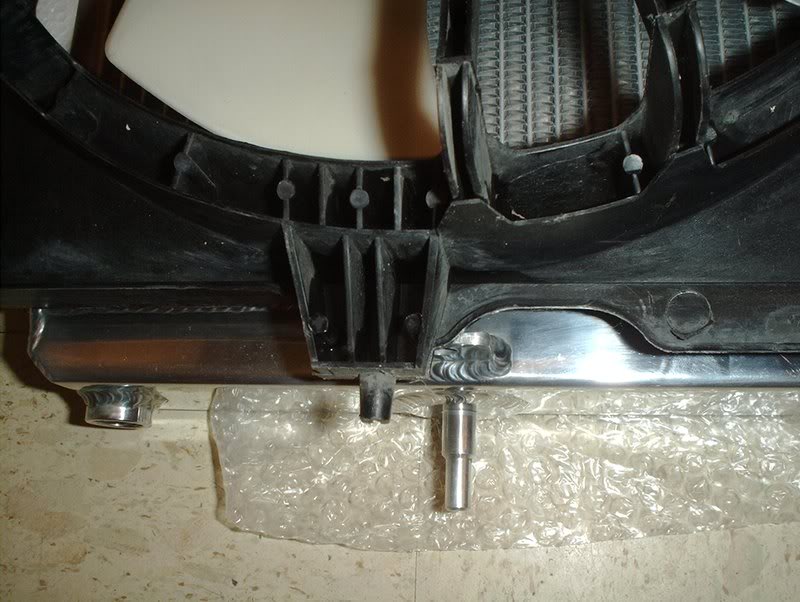
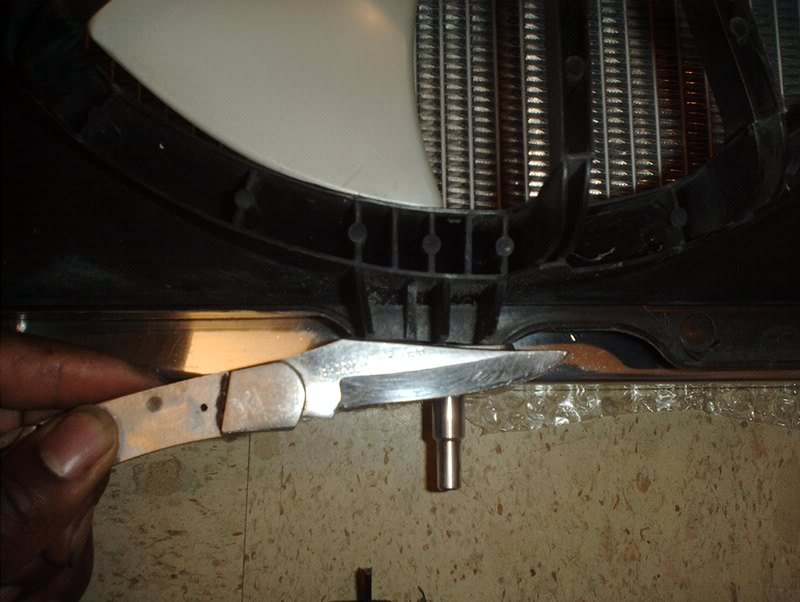
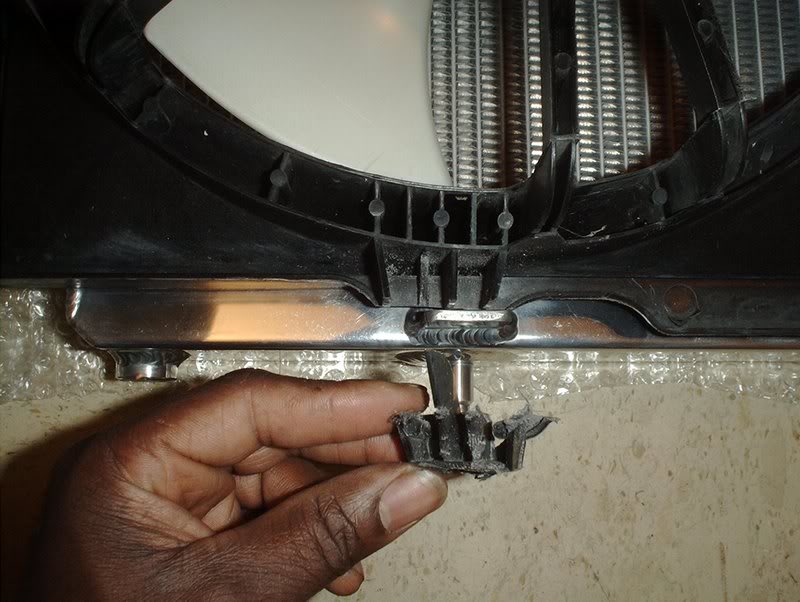
The lower left mounting point does not line up with the bracket on the Koyo or sit flush either. It overlaps so the little tab just will not go into the slot as you can see here.
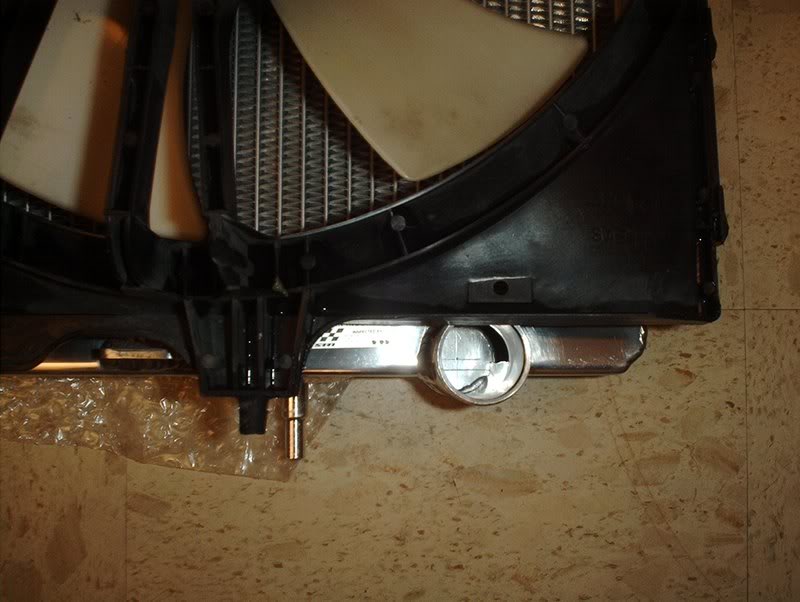
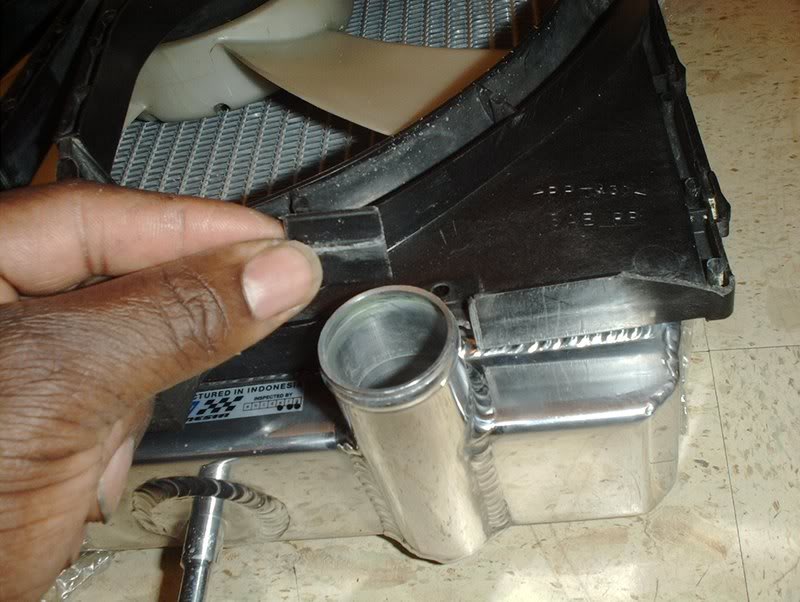
The lower right mounting point also does not line up or sit flush against the radiator.
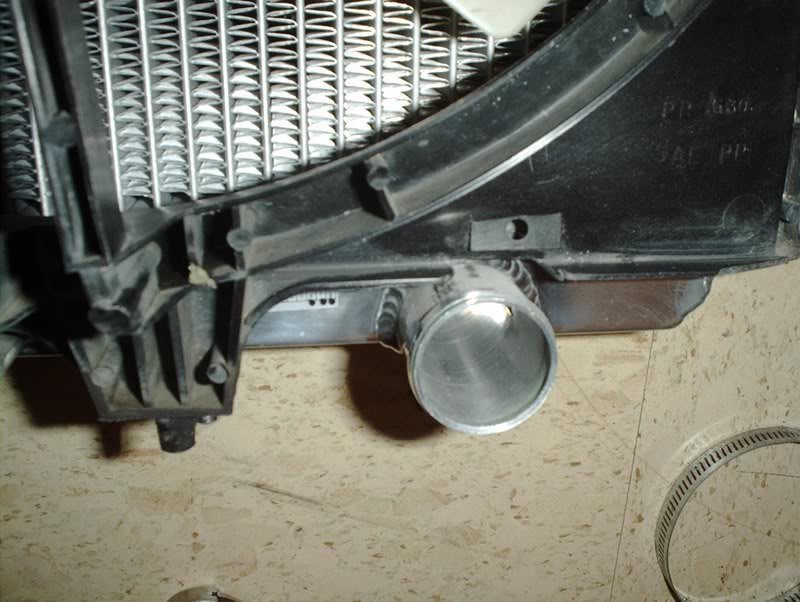
As you can see here the fan is blocked by the lower radiator outlet and will need to be modded.
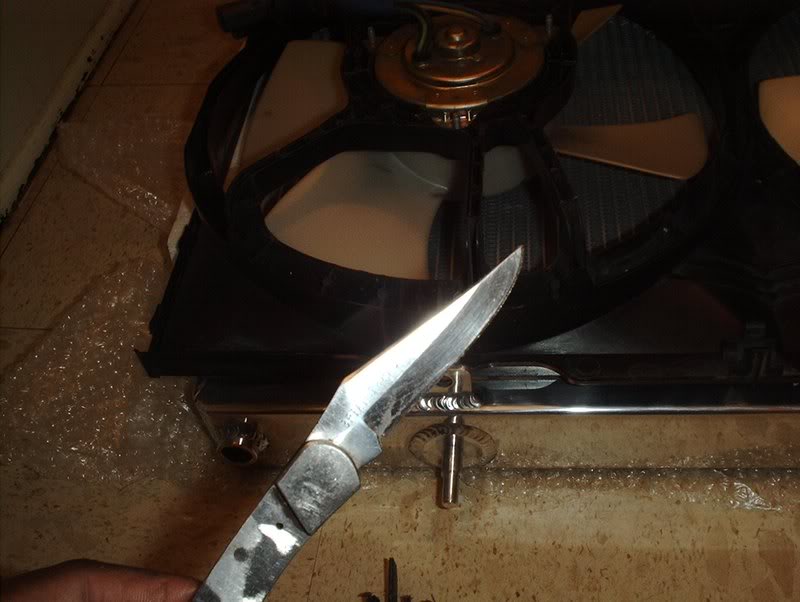
I figured the easiest way would just be to trim the plastic just enough to allow the fan to sit flush against the radiator, time to use the knife again.
I started with the lower left mounting point first.
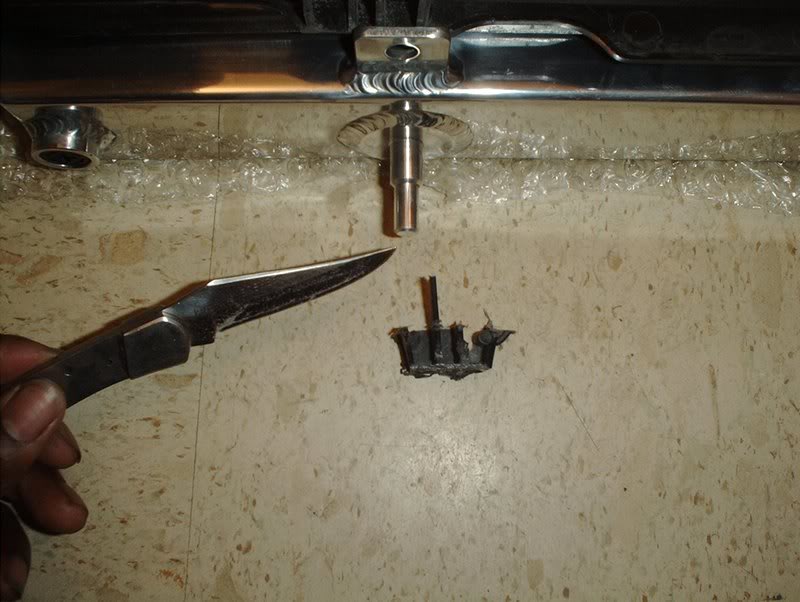
I just sawed into it from all directions until it was loose enough to snap off.
This is how much I took off.
Next, I went to the lower right mounting point.
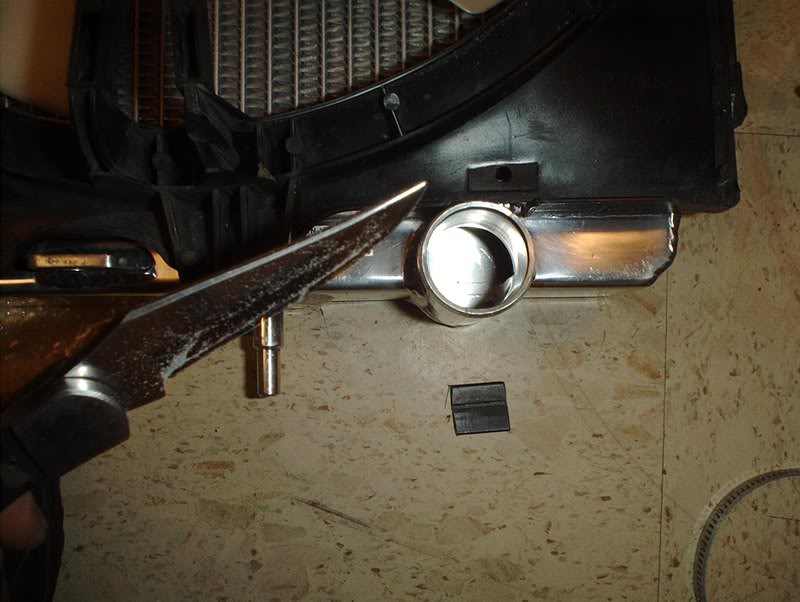
It's blocked by the lower radiator outlet...
and just needs a small wafer of a section trimmed off to allow the flushness.
Complete!
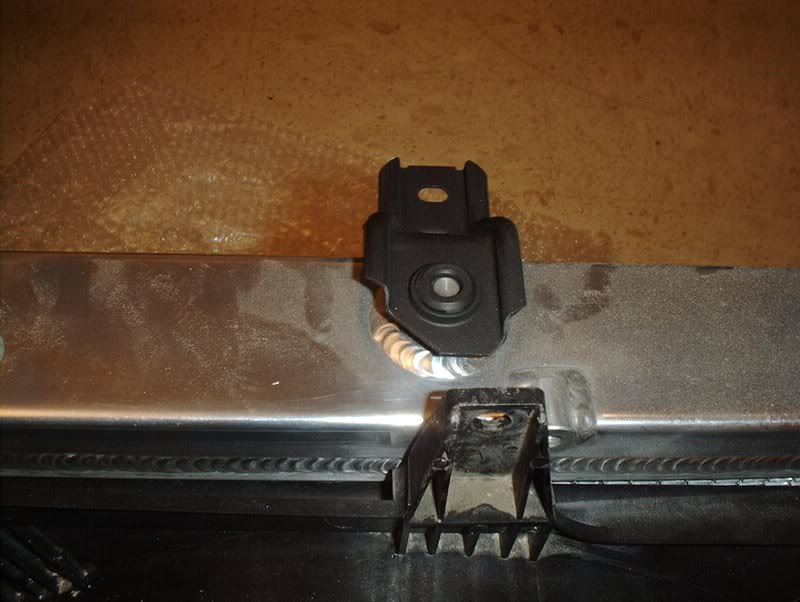
While I was at it I decided to mount the radiator brackets on because I was also worried that because the mounting points didn't line up then the rad brackets would also block the fan from sitting flush but they did not interfere at all.
As I said before the upper left mounting point lines up perfectly, you can bolt it in and the rad bracket does not interfere.
The upper right mounting point does not line up to where you can bolt it to the rad but it also does not interfere with flushness. The rad bracket can be mounted without any problem. You are left with this mounting point sticking out above the rad. You have the option to shave it off also since it's not needed but it's not necessary.
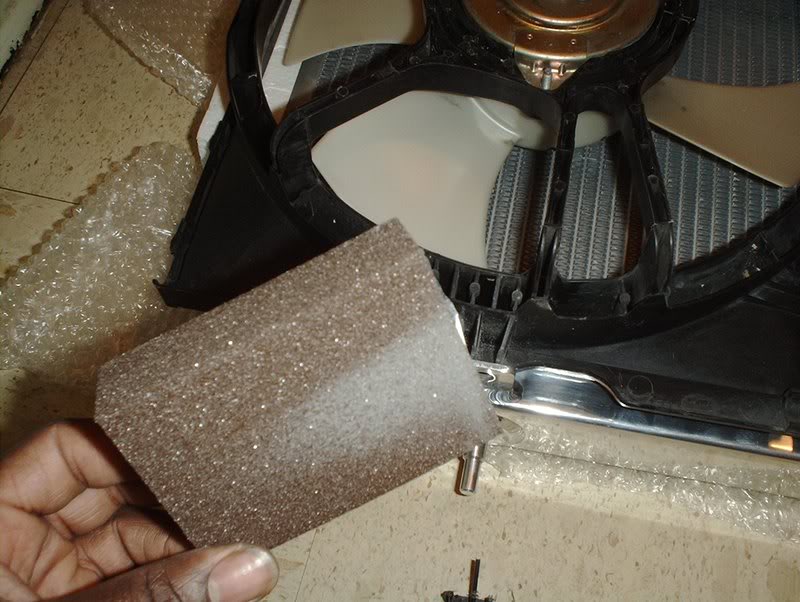
When I was done trimming the excess plastic off, I just took a sanding block and sanded the edges down smooth for a cleaner look.
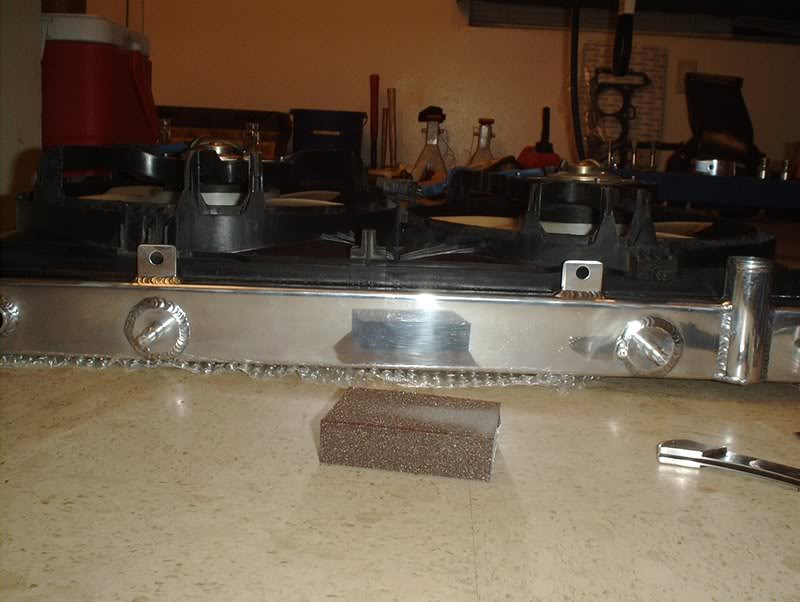
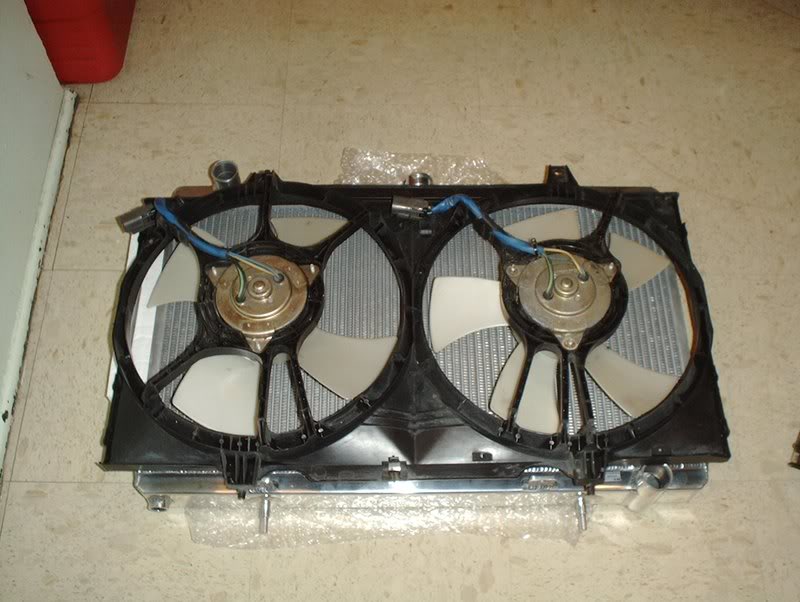
With all the trimming done the fans now sit flush against the radiator. All I have to do now is get some of those ties that they use for mounting the rads and wire it up...
but before I did that I decided to break it down and clean it up first.
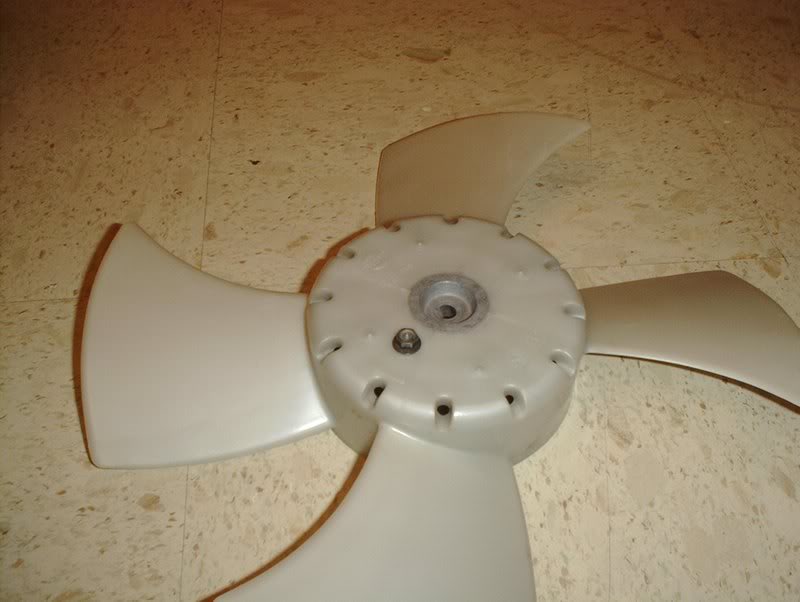
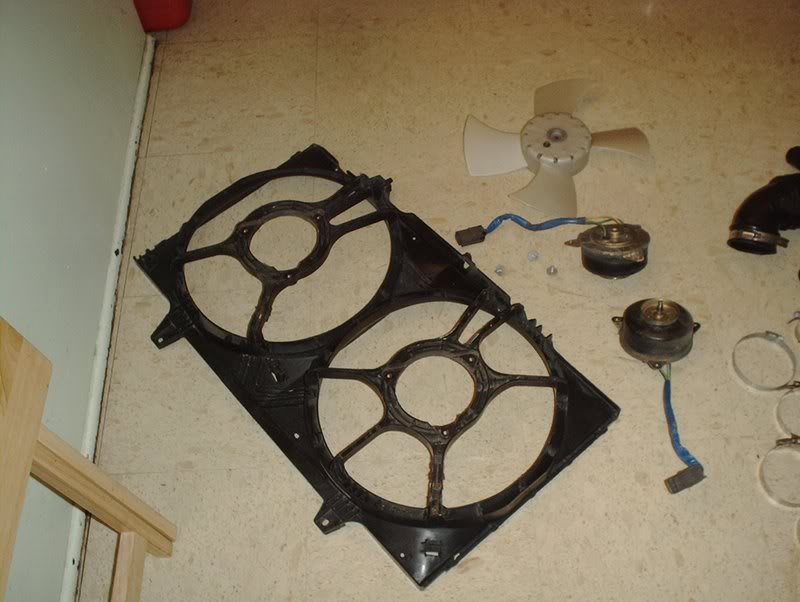
All you need is a 10mm socket. For the fans there is one 10mm nut holding them in.
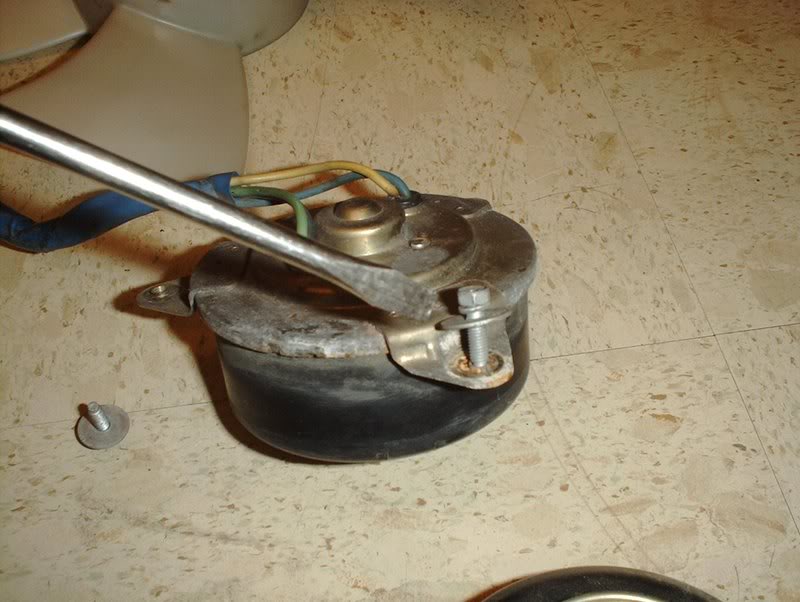
And for the fan motors there are three 10mm bolts holding them in.
TO BE CONTINUED.....
Koyo rad, Altima fans and the Permacool.
The dual Altima fans cover the entire surface area of the radiator, as a matter of fact, they hang over a bit which is where you might run into a slight complication.
The Altima fans don't exactly line up with all the mounting points on the Koyo radiator so it doesn't sit flush against the rad. This is where you have to mod it for fitment. This is where I didn't want to go, if I have to mod this thing and couldn't do a clean job I was planning to just go with the Permacool setup or just wait and save for the Flex-a-lites which to my knowledge have no fitment issues.
The upper left mounting point fits perfectly, all I will need to do here is place a bolt to mount the fan to the Koyo.
The upper right mounting point does not line up, I also thought I might have to trim this off because of the radiator bracket but we'll get into that later.
The lower left mounting point does not line up with the bracket on the Koyo or sit flush either. It overlaps so the little tab just will not go into the slot as you can see here.
The lower right mounting point also does not line up or sit flush against the radiator.
As you can see here the fan is blocked by the lower radiator outlet and will need to be modded.
I figured the easiest way would just be to trim the plastic just enough to allow the fan to sit flush against the radiator, time to use the knife again.
I started with the lower left mounting point first.
I just sawed into it from all directions until it was loose enough to snap off.
This is how much I took off.
Next, I went to the lower right mounting point.
It's blocked by the lower radiator outlet...
and just needs a small wafer of a section trimmed off to allow the flushness.
Complete!
While I was at it I decided to mount the radiator brackets on because I was also worried that because the mounting points didn't line up then the rad brackets would also block the fan from sitting flush but they did not interfere at all.
As I said before the upper left mounting point lines up perfectly, you can bolt it in and the rad bracket does not interfere.
The upper right mounting point does not line up to where you can bolt it to the rad but it also does not interfere with flushness. The rad bracket can be mounted without any problem. You are left with this mounting point sticking out above the rad. You have the option to shave it off also since it's not needed but it's not necessary.
When I was done trimming the excess plastic off, I just took a sanding block and sanded the edges down smooth for a cleaner look.
With all the trimming done the fans now sit flush against the radiator. All I have to do now is get some of those ties that they use for mounting the rads and wire it up...
but before I did that I decided to break it down and clean it up first.
All you need is a 10mm socket. For the fans there is one 10mm nut holding them in.
And for the fan motors there are three 10mm bolts holding them in.
TO BE CONTINUED.....
Last edited by positron; 04-20-2008 at 02:32 AM.
04-26-2008, 04:56 AM
#146
Contributing Member
Thread Starter
Join Date: Sep 2002
Location: Starkville, MS.
Posts: 1,192
Spark Plugs
I got a set of spark plugs in today, here's what I did.
Tools needed:
Socket wrench
Spark plug extension
16mm spark plug socket
10mm socket
Canned-air
Spark plug gapper
Before I got serious about doing a SR swap I called myself buying up parts for the intended swap even before getting the engine....big mistake. I did no research, didn't know exactly what I needed and wound up with a couple of useless parts so anyone who plans on doing this who doesn't have a good understanding of auto mechanics, aka "shadetree mechanic" like me, make sure you do your research so you don't waste time and money on parts that you don't need.
  Because of my impatience....
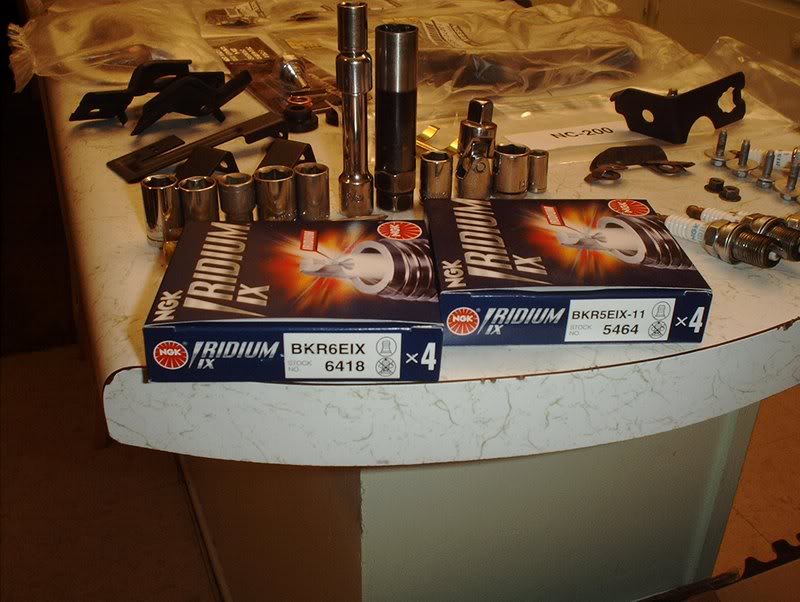
I now have two sets of plugs one of which is completely useless to me.
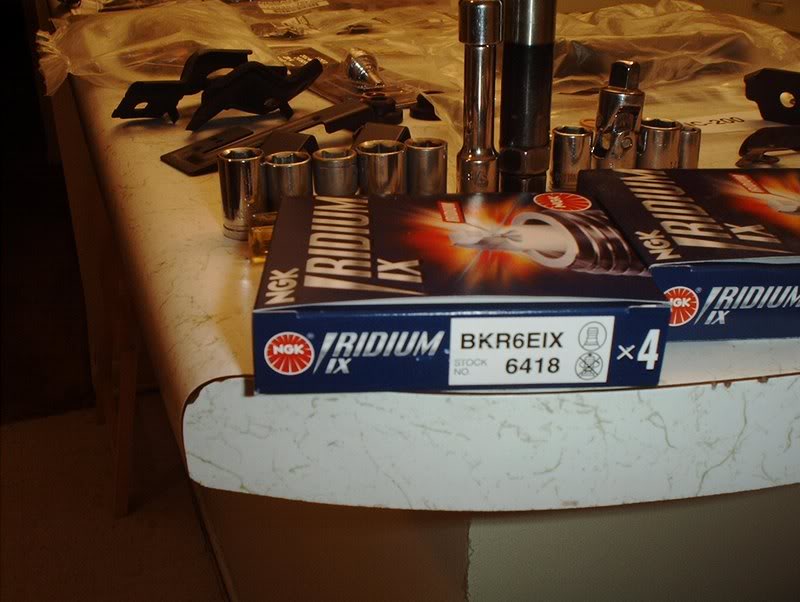
BKR6EIX Stock#:6418-stock boost. Heat range=6
BKR7EIX-Mild hp. Heat range=7
BKR8EIX-Heavily modified, high hp. Heat range=8
I'm planning to run a stock boost, stock engine setup so this is the set that I need. I got this set from FRSport.com and they come pre-gapped for a plug and play install.
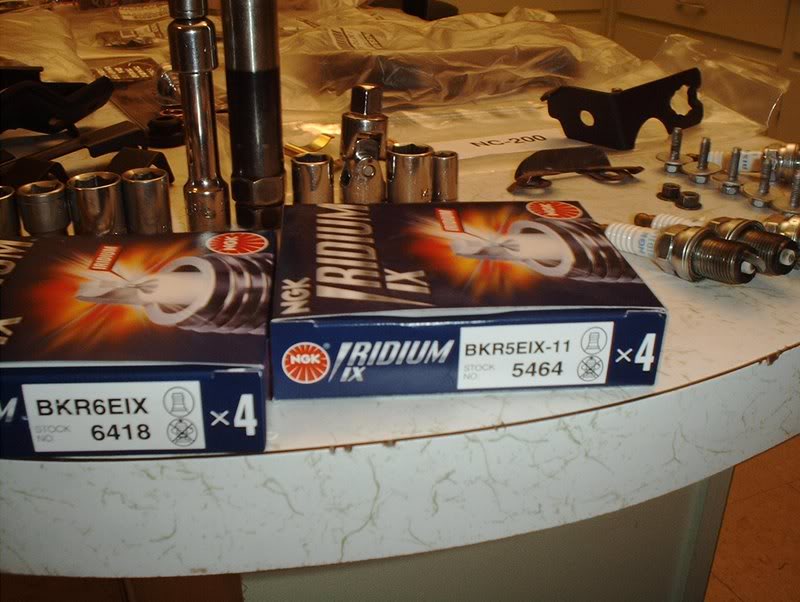
This is the set that I bought before. Came to find out that they are not what I'll need and they are gapped to .040. BKR5EIX-11 Stock#:5464?????
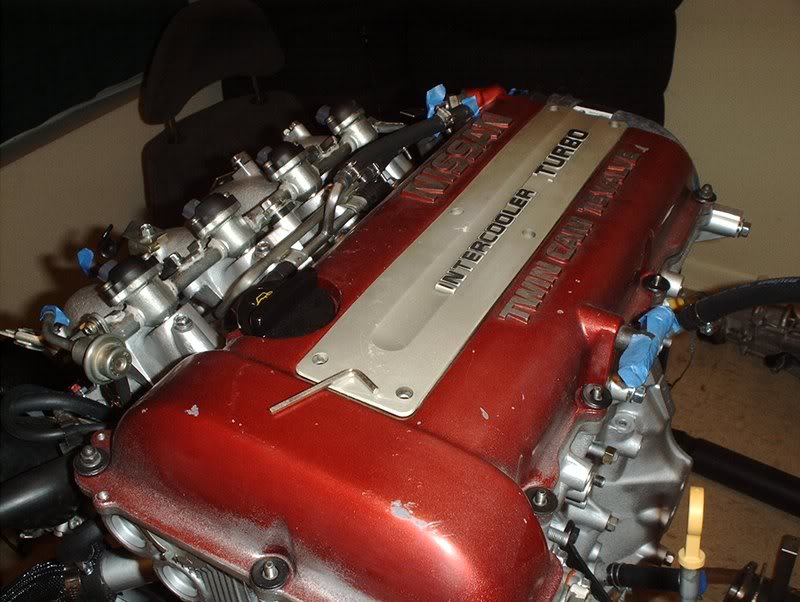
Let's get started. Get a allen wrench to remove the spark plug/coil pack cover. There are six allen head bolts.
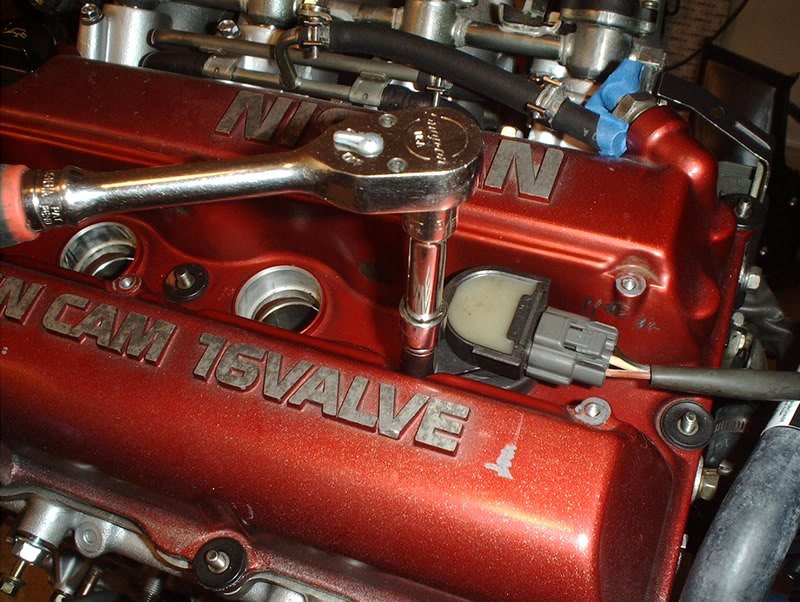
Use a 10mm socket or a screwdriver to remove the coilpack bolts from the valve cover.
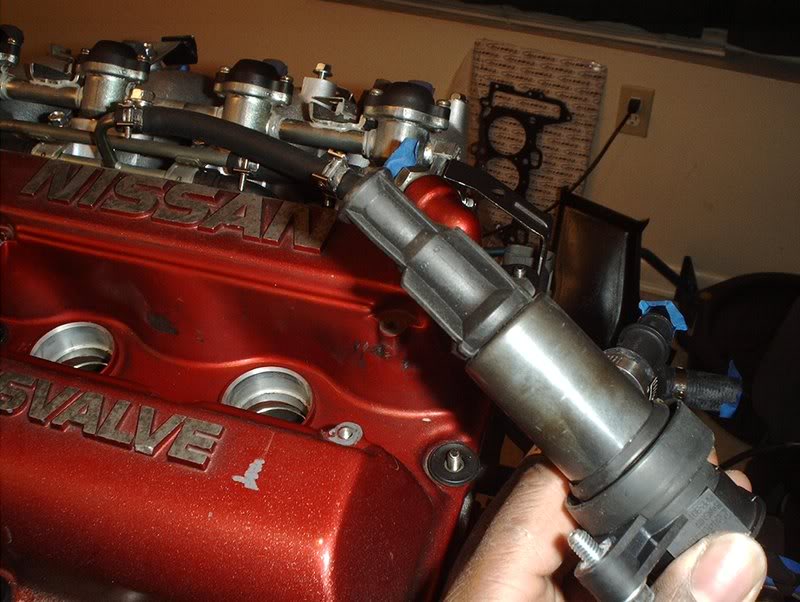
Pull the coilpacks out one at a time. I think some people disconnect the harnesses from the coilpacks before pulling them.
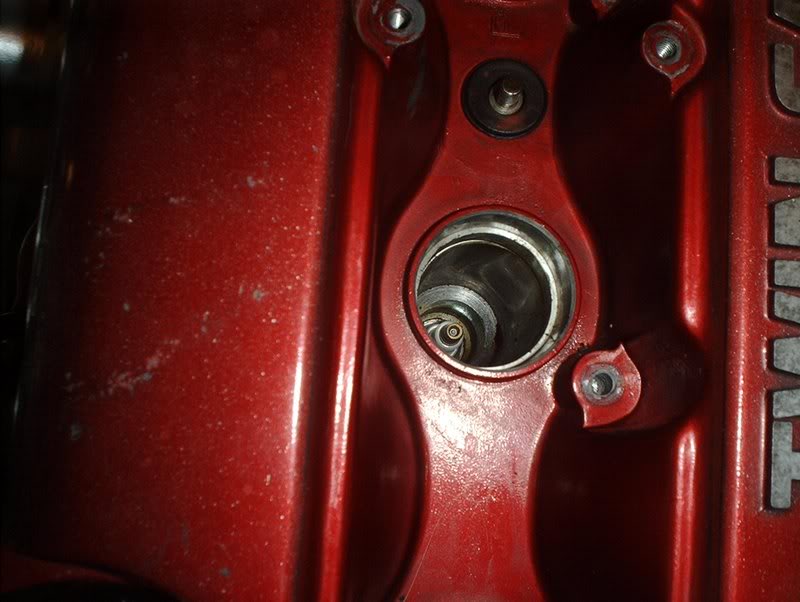
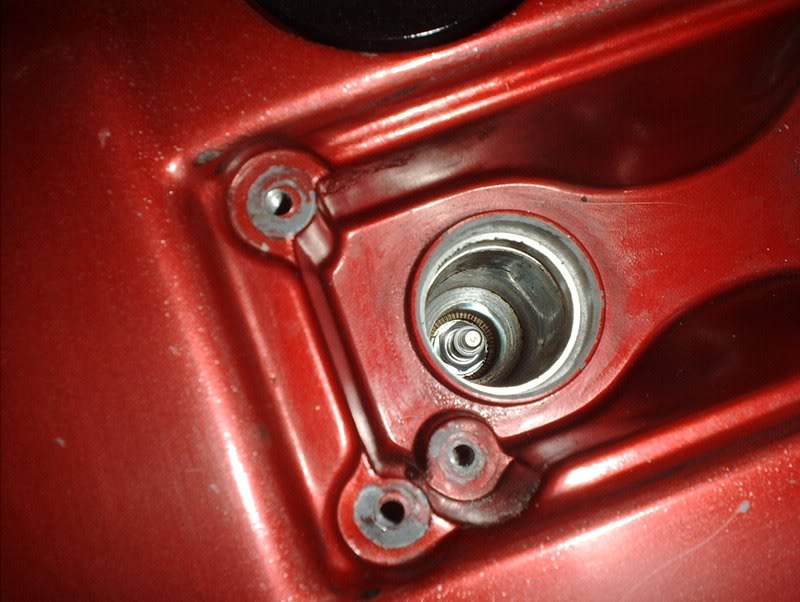
You can see the plugs deep down in the block.
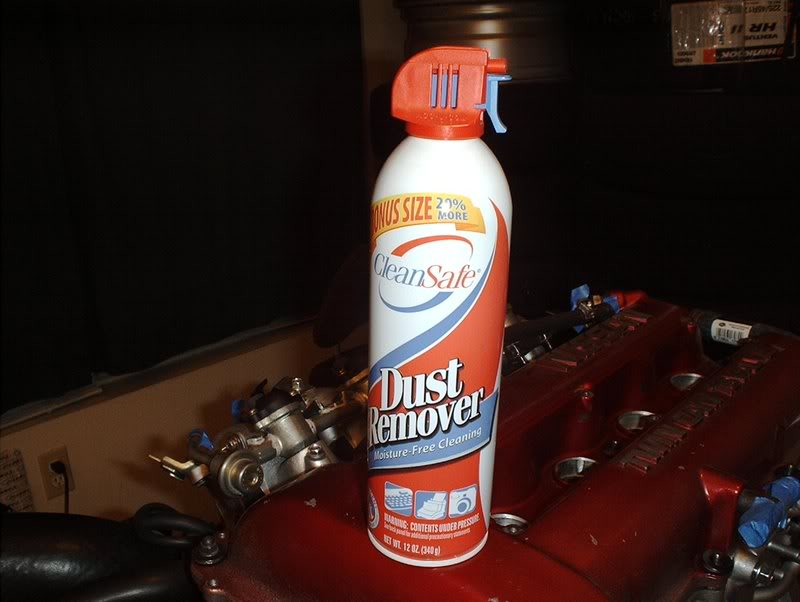
Take a can of compressed air and blow out the well to remove any debris that could get into the chamber once you take out your plugs.
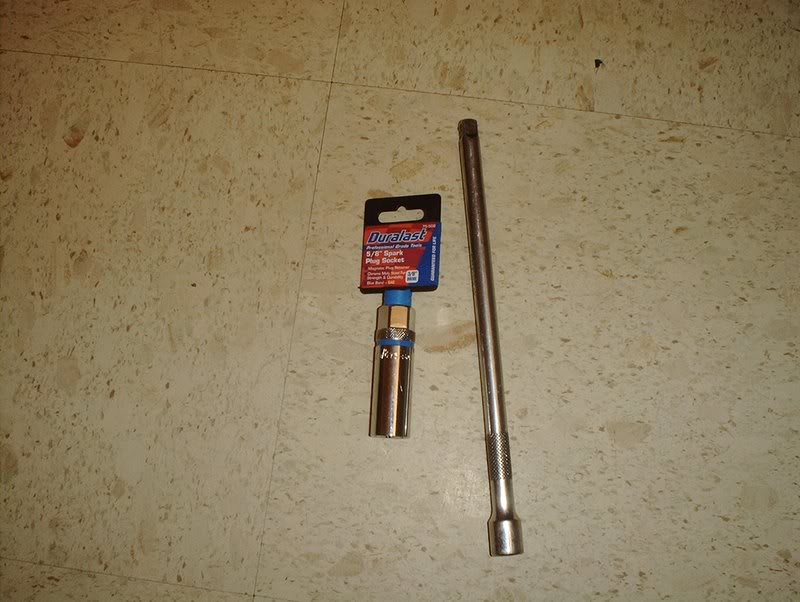
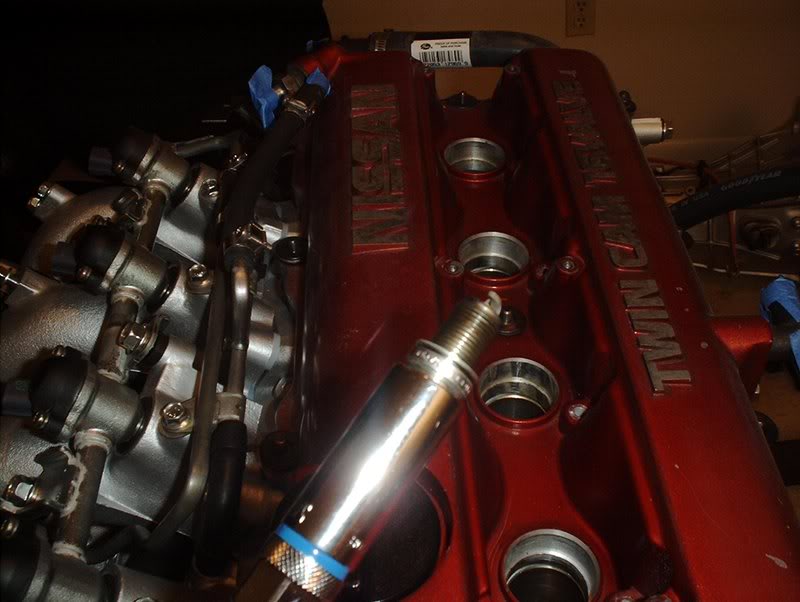
16mm spark plug socket and spark plug extension.
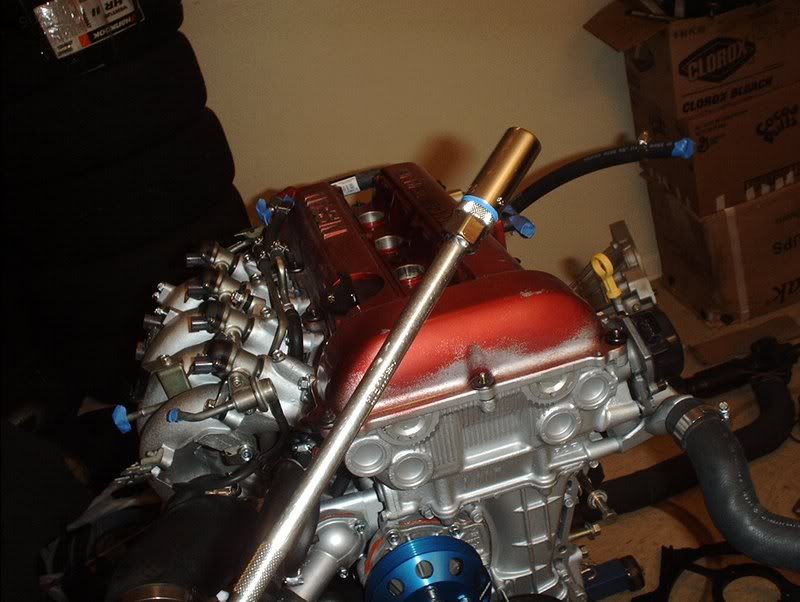
Take your spark plug socket...

and place it in the well.
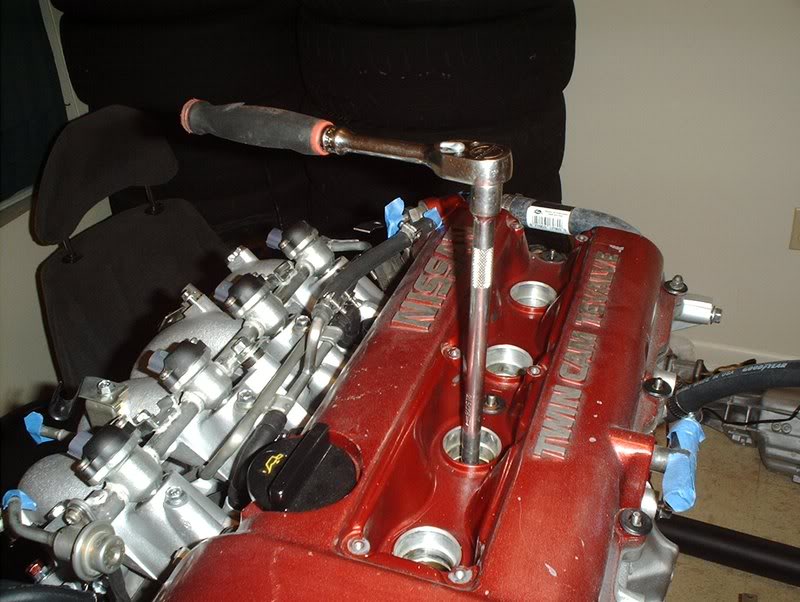
Remove the spark plug.
Pull it out. Remove all four plugs.
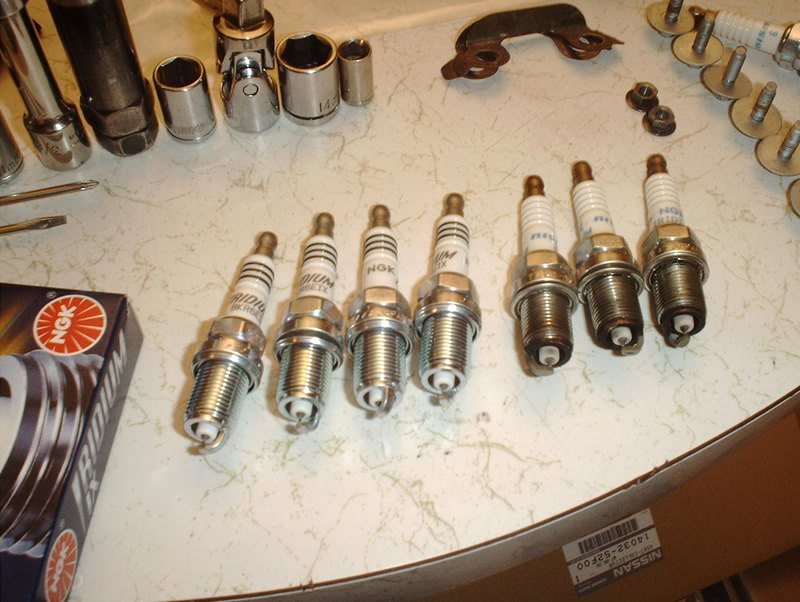
New plugs versus old plugs. I looked it up but I still can't judge the condition of these pulled plugs. From what I read they seem to be normal or maybe carbon fouled...I can't tell...anyone? Here's the breakdown.
NORMAL PLUG-Light tan or gray deposits on the firing tip.
CARBON FOULED PLUG-Identified by soft, sooty black deposits, may indicate an improperly tuned vehicle. Check the air cleaner, ignition components and engine control system.
PHYSICALLY DAMAGED PLUG-May be evidence of severe detonation in that cylinder. Continued detonation could not only damage that cylinder but the engine as well.
OIL FOULED PLUG-Indicates an engine with worn piston rings and or bad valve seals allowing excessive oil to enter the chamber.
EXTREMELY GAPPED DISTORTED PLUG-Has been left in the chamber for too long as indicated by an extreme gap. These could cause misfiring and stumbling accompanied by a noticeable lack of power.
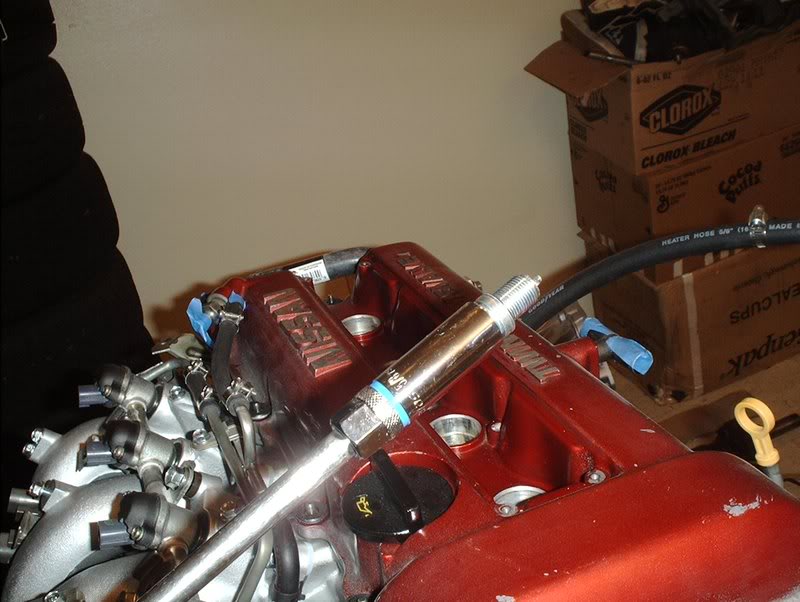
Take the new plugs and insert it into the socket.

In order to avoid crossthreading them I seated them by hand instead of using the socket. You can feel when they are properly threaded better this way. Once you get them in, use the socket to tighten them.
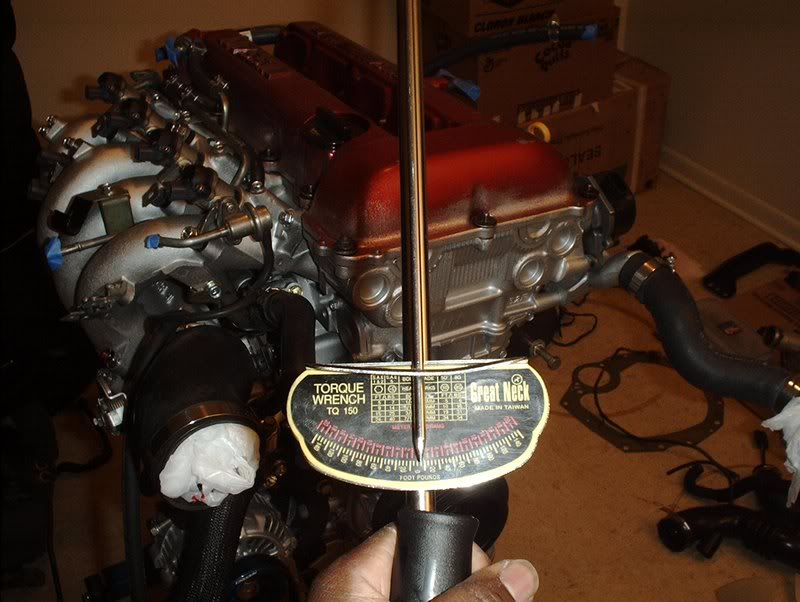
Torque the plugs to 14-22ft.lbs.
Installed.
Install the other plugs the same way, reinstall your coilpacks and your spark plug/coil pack cover.
If you have to manually gap your plugs then you can do so with a spark plug gapping tool. You can get them at the parts store for like a buck.
Spark plug gapping tool...also useful to check gapping.
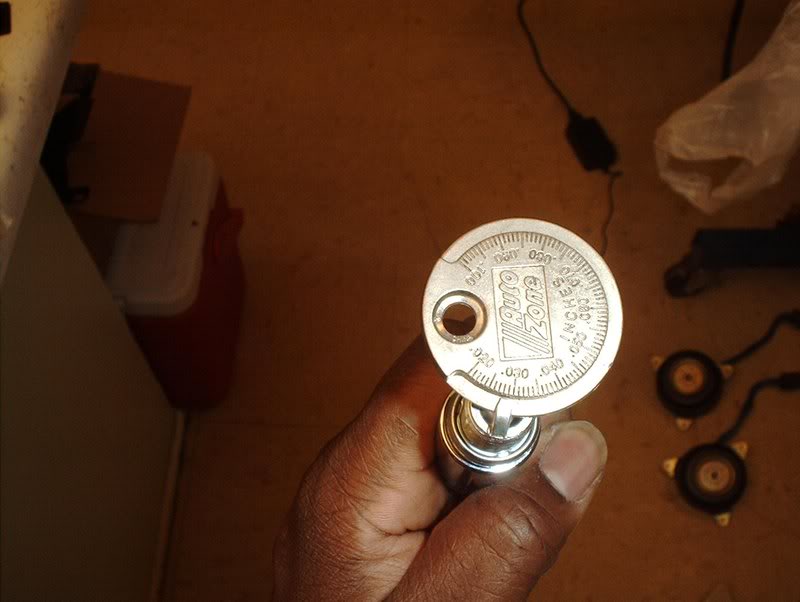
Like I said before, these came pre-gapped to .030 but I checked just in case and they were.
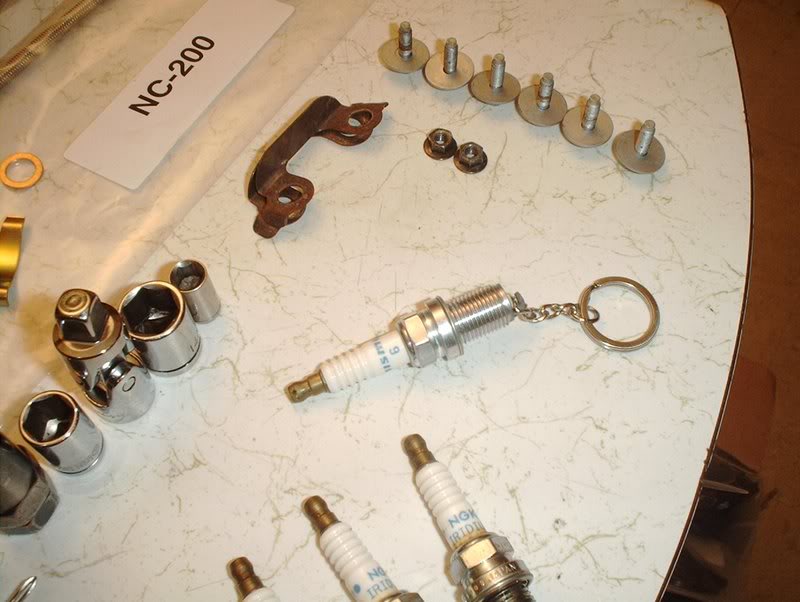
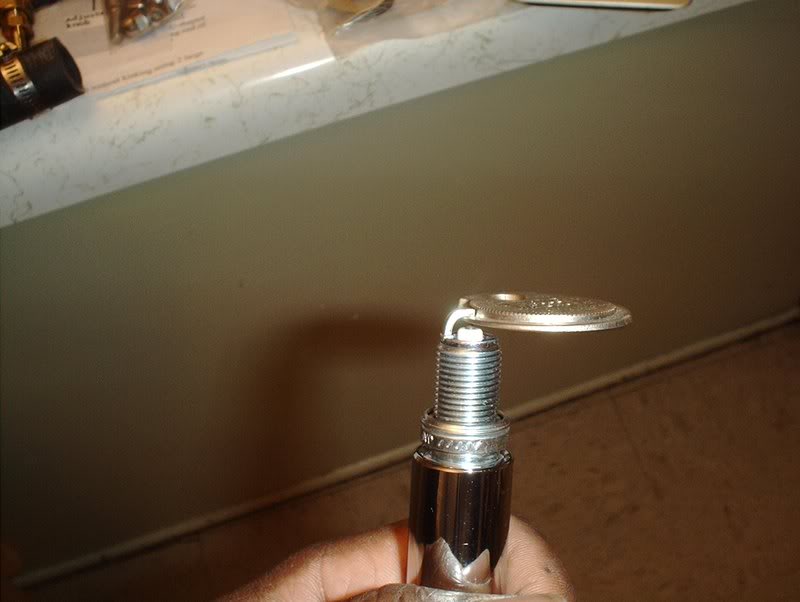
I thought it was cool that these old plugs were NISMO so I decided to keep them. I even cleaned one up and made a keychain out of it.
Tools needed:
Socket wrench
Spark plug extension
16mm spark plug socket
10mm socket
Canned-air
Spark plug gapper
Before I got serious about doing a SR swap I called myself buying up parts for the intended swap even before getting the engine....big mistake.
I did no research, didn't know exactly what I needed and wound up with a couple of useless parts so anyone who plans on doing this who doesn't have a good understanding of auto mechanics, aka "shadetree mechanic" like me, make sure you do your research so you don't waste time and money on parts that you don't need. Because of my impatience....I now have two sets of plugs one of which is completely useless to me.
BKR6EIX Stock#:6418-stock boost. Heat range=6
BKR7EIX-Mild hp. Heat range=7
BKR8EIX-Heavily modified, high hp. Heat range=8
I'm planning to run a stock boost, stock engine setup so this is the set that I need. I got this set from FRSport.com and they come pre-gapped for a plug and play install.
This is the set that I bought before.
Came to find out that they are not what I'll need and they are gapped to .040. BKR5EIX-11 Stock#:5464????? Let's get started. Get a allen wrench to remove the spark plug/coil pack cover. There are six allen head bolts.
Use a 10mm socket or a screwdriver to remove the coilpack bolts from the valve cover.
Pull the coilpacks out one at a time. I think some people disconnect the harnesses from the coilpacks before pulling them.
You can see the plugs deep down in the block.
Take a can of compressed air and blow out the well to remove any debris that could get into the chamber once you take out your plugs.
16mm spark plug socket and spark plug extension.
Take your spark plug socket...
and place it in the well.
Remove the spark plug.
Pull it out. Remove all four plugs.
New plugs versus old plugs. I looked it up but I still can't judge the condition of these pulled plugs. From what I read they seem to be normal or maybe carbon fouled...I can't tell...anyone? Here's the breakdown.
NORMAL PLUG-Light tan or gray deposits on the firing tip.
CARBON FOULED PLUG-Identified by soft, sooty black deposits, may indicate an improperly tuned vehicle. Check the air cleaner, ignition components and engine control system.
PHYSICALLY DAMAGED PLUG-May be evidence of severe detonation in that cylinder. Continued detonation could not only damage that cylinder but the engine as well.
OIL FOULED PLUG-Indicates an engine with worn piston rings and or bad valve seals allowing excessive oil to enter the chamber.
EXTREMELY GAPPED DISTORTED PLUG-Has been left in the chamber for too long as indicated by an extreme gap. These could cause misfiring and stumbling accompanied by a noticeable lack of power.
Take the new plugs and insert it into the socket.
In order to avoid crossthreading them I seated them by hand instead of using the socket. You can feel when they are properly threaded better this way. Once you get them in, use the socket to tighten them.
Torque the plugs to 14-22ft.lbs.
Installed.
Install the other plugs the same way, reinstall your coilpacks and your spark plug/coil pack cover.
If you have to manually gap your plugs then you can do so with a spark plug gapping tool. You can get them at the parts store for like a buck.
Spark plug gapping tool...also useful to check gapping.
Like I said before, these came pre-gapped to .030 but I checked just in case and they were.
I thought it was cool that these old plugs were NISMO so I decided to keep them. I even cleaned one up and made a keychain out of it.
Last edited by positron; 04-26-2008 at 05:08 AM.
04-26-2008, 12:55 PM
#147
cool man just be carefull with the spark plug keychain.
its a used spark plug so the white part thats made from ceramic is electrically charged what this means is if the spark plug so much as gently touches some glass the glass will completely shatter silently too lol
its a used spark plug so the white part thats made from ceramic is electrically charged what this means is if the spark plug so much as gently touches some glass the glass will completely shatter silently too lol
04-26-2008, 01:58 PM
#148
Contributing Member
Thread Starter
Join Date: Sep 2002
Location: Starkville, MS.
Posts: 1,192
cool man just be carefull with the spark plug keychain.
its a used spark plug so the white part thats made from ceramic is electrically charged what this means is if the spark plug so much as gently touches some glass the glass will completely shatter silently too lol
its a used spark plug so the white part thats made from ceramic is electrically charged what this means is if the spark plug so much as gently touches some glass the glass will completely shatter silently too lol
 You learn something new everyday.
04-26-2008, 04:06 PM
You learn something new everyday.
04-26-2008, 04:06 PM
#149

cool man just be carefull with the spark plug keychain.
its a used spark plug so the white part thats made from ceramic is electrically charged what this means is if the spark plug so much as gently touches some glass the glass will completely shatter silently too lol
its a used spark plug so the white part thats made from ceramic is electrically charged what this means is if the spark plug so much as gently touches some glass the glass will completely shatter silently too lol
Actually, I never knew how a little piece of ceramic could do that, but what you stated makes a lot of sense.
04-26-2008, 04:28 PM
#150
Registered User

Join Date: Oct 2007
Location: Manahawkin, NJ
Posts: 48
 You're kidding, right? I mean, I don't mean to be a jerk... but electrically charged Porcelain? The porcelain is there because it is one of the greatest insulators on earth and can not transmit a charge.
I know that the porcelain from a spark plug will shatter glass, but it has nothing to do with an electrical charge.